Command Reference
This page documents all CLI commands available in TiPToP.
Important
Command-line interfaces may change at any time. Always use <command> --help as the source of truth for current options and usage.
All commands must be run inside the pixi environment. Activate the shell with pixi shell from the tiptop directory, then run commands directly. Alternatively, prefix commands with pixi run <command>.
Main Entrypoint
tiptop-run
Runs the complete end-to-end TiPToP pipeline: perception (depth estimation, object detection/segmentation, grasp generation), task and motion planning with cuTAMP, and optionally trajectory execution on the robot. Runs continuously on the real robot, prompting for a new task instruction after each run.
See Getting Started - Run TiPToP for setup instructions. For offline evaluation without a robot, see tiptop-h5.
Prerequisites:
Bamboo controller server must be running
Perception servers (M2T2 and FoundationStereo) must be running
Robot must be calibrated and gripper mask computed
Workspace obstacles must be defined (see Getting Started)
GOOGLE_API_KEYenvironment variable must be set
Available flags:
--execute-plan / --no-execute-plan- Whether to execute the plan on the real robot (default: True)--enable-recording / --no-enable-recording- Record external camera video during execution (default: False)--output-dir STR- Top-level directory to save results; a timestamped subdirectory will be created (default: “tiptop_outputs”)--cutamp-visualize / --no-cutamp-visualize- Enable cuTAMP planning visualization in Rerun, significantly slows down planning (default: False)--max-planning-time FLOAT- Maximum time to spend planning with cuTAMP across all skeletons in seconds (default: 60.0)--opt-steps-per-skeleton INT- Number of optimization steps per skeleton in cuTAMP (default: 500)--num-particles INT- Number of particles for cuTAMP; decrease if running out of GPU memory (default: 256)
Data Organization:
By default, rollouts are saved to tiptop_outputs/eval/{timestamp}/. After execution, you’ll be prompted to label the rollout:
Enter ‘y’ → moved to
tiptop_outputs/success/{date}/{timestamp}/Enter ‘n’ → moved to
tiptop_outputs/failure/{date}/{timestamp}/Leave empty → keeps rollout in
tiptop_outputs/eval/{timestamp}/Any other input → re-prompts
Labeled rollouts are moved out of eval/ into the appropriate category. The directory structure follows DROID’s convention:
tiptop_outputs/
├── eval/              # Unlabeled rollouts
├── failure/
│   ├── 2026-01-24/    # Organized by date
│   └── 2026-01-25/
└── success/
    ├── 2026-01-24/
    └── 2026-01-25/
Example usage:
# Normal execution on robot
tiptop-run

# Dry run without executing on robot (for testing)
tiptop-run --no-execute-plan --cutamp-visualize

# Execute with video recording
tiptop-run --enable-recording

# Custom output directory
tiptop-run --output-dir my_results
Warning
The robot will move to the capture position when the command starts. Ensure the workspace is clear and keep your hand on the e-stop.
What to expect:
After warmup and health checks you’ll be prompted to enter a natural language task instruction after each run. TiPToP currently supports pick-and-place tasks. Results and visualizations are logged to Rerun and saved to a new run directory based on the timestamp in --output-dir.
tiptop-h5
Offline evaluation mode. Loads a pre-recorded RGB-D observation from an H5 file (droid-sim-evals format) and runs the TiPToP pipeline without a real robot, saving a serialized plan JSON for downstream evaluation.
Prerequisites:
M2T2 server must be running
GOOGLE_API_KEYenvironment variable must be set
Available flags:
--h5-path STR- Path to H5 observation file (required)--task-instruction STR- Natural language task instruction, e.g."put the cube in the bowl"(required)--output-dir STR- Top-level directory to save results; a timestamped subdirectory will be created (default: “tiptop_h5_outputs”)--max-planning-time FLOAT- Maximum time to spend planning with cuTAMP across all skeletons in seconds (default: 60.0)--opt-steps-per-skeleton INT- Number of optimization steps per skeleton in cuTAMP (default: 500)--num-particles INT- Number of particles for cuTAMP; decrease if running out of GPU memory (default: 256)--cutamp-visualize / --no-cutamp-visualize- Enable cuTAMP planning visualization in Rerun, significantly slows down planning (default: False)--rr-spawn / --no-rr-spawn- Spawn a Rerun viewer; set to False to skip visualization (default: True)
Example usage:
tiptop-h5 \
  --h5-path /path/to/observation.h5 \
  --task-instruction "put the cube in the bowl"

# Save outputs to a custom directory without spawning Rerun
tiptop-h5 \
  --h5-path /path/to/observation.h5 \
  --task-instruction "put the cube in the bowl" \
  --output-dir my_eval_outputs \
  --no-rr-spawn
tiptop-rerun
Re-runs TiPToP from a saved run directory. Loads the observation (RGB, depth, intrinsics, camera pose, joint positions, and gripper mask) from a previous run. Task instruction and planning parameters default to the original run’s values but can be overridden.
Prerequisites:
M2T2 server must be running
GOOGLE_API_KEYenvironment variable must be setA saved TiPToP run directory (from
tiptop-run,tiptop-h5, ortiptop-rerun)
Available flags:
--run-dir STR- Path to a saved TiPToP run directory (required)--task-instruction STR- Task instruction override; defaults to the original run’s instruction--output-dir STR- Top-level directory to save results; a timestamped subdirectory will be created (default: “tiptop_rerun_outputs”)--max-planning-time FLOAT- Override max planning time; defaults to the original run’s value--opt-steps-per-skeleton INT- Override optimization steps per skeleton; defaults to the original run’s value--num-particles INT- Override number of particles; defaults to the original run’s value--cutamp-visualize / --no-cutamp-visualize- Enable cuTAMP planning visualization in Rerun, significantly slows down planning (default: False)--rr-spawn / --no-rr-spawn- Spawn a Rerun viewer; set to False to skip visualization (default: True)
Example usage:
# Re-run from a previous run with original parameters
tiptop-rerun --run-dir tiptop_outputs/eval/2026-04-05_13-30-20/

# Re-run with a different task instruction
tiptop-rerun \
  --run-dir tiptop_outputs/eval/2026-04-05_13-30-20/ \
  --task-instruction "put the cube on the table"

# Re-run with more particles and longer planning time
tiptop-rerun \
  --run-dir tiptop_outputs/eval/2026-01-24_15-30-00/ \
  --num-particles 512 \
  --max-planning-time 120.0
tiptop-server
Runs the TiPToP perception and planning pipeline as a WebSocket server. Clients send RGB-D observations and receive serialized trajectory plans, allowing consumers on separate machines or running different Python versions to query TiPToP. A /health HTTP endpoint is available for liveness checks.
Prerequisites:
M2T2 server must be running
GOOGLE_API_KEYenvironment variable must be set
Available flags:
--host STR- Host address to bind to (default: “0.0.0.0”)--port INT- Port to listen on (default: 8765)--num-particles INT- Number of particles for cuTAMP; decrease if running out of GPU memory (default: 256)--max-planning-time FLOAT- Maximum time to spend planning with cuTAMP across all skeletons in seconds (default: 60.0)--rerun-mode STR- Rerun visualization mode:"stream"spawns the Rerun viewer,"save"writes.rrdfiles to disk,"disabled"skips all Rerun logging (default: “disabled”)--include-workspace / --no-include-workspace- Include real-robot workspace cuboids in the collision world (default: False)
Example usage:
# Start the server with default settings
tiptop-server

# Bind to a specific port, save Rerun streams to disk for offline review
tiptop-server --port 9000 --rerun-mode save

# Include real-robot workspace cuboids in the collision world
tiptop-server --include-workspace
Robot Control
Important
The Bamboo controller must be running for all commands in this section.
get-joint-positions
Prints the current joint positions of the robot.
Example usage:
get-joint-positions
The command will print a list of 7 joint angles representing the current robot configuration.
Use cases:
Setting custom capture positions - manually move robot to desired view, run this command, then copy joint values to
robot.q_captureintiptop/config/tiptop.ymlVerifying robot connectivity during initial setup
go-home
Moves the robot to its home joint configuration using collision-aware motion planning. The home configuration is defined in tiptop/config/tiptop.yml under robot.q_home.
Prerequisites:
Workspace obstacles should be defined for collision avoidance (see Getting Started)
Available flags:
--time-dilation-factor FLOAT- Time dilation factor for trajectory execution; lower values = slower, safer motion (default: from config)
Example usage:
go-home

# Move slower for safety
go-home --time-dilation-factor 0.3
Danger
The robot will move immediately after motion planning. Ensure the workspace is clear and keep your hand on the e-stop for safety. Motion planning only considers obstacles defined in tiptop/workspace.py.
This is useful for returning to a known safe position after completing tasks or when initializing the system.
go-to-capture
Moves the robot to the image capture configuration defined in robot.q_capture in tiptop/config/tiptop.yml.
Prerequisites:
Capture position should be configured (see Getting Started)
Workspace obstacles should be defined for collision avoidance (see Getting Started)
Available flags:
--time-dilation-factor FLOAT- Time dilation factor for trajectory execution; lower values = slower, safer motion (default: from config)
Example usage:
go-to-capture

# Move slower for safety
go-to-capture --time-dilation-factor 0.1
Danger
The robot will move immediately after motion planning. Ensure the workspace is clear and keep your hand on the e-stop for safety. Motion planning only considers obstacles defined in tiptop/workspace.py.
This command is automatically called by tiptop-run, but can be run independently to:
Verify the capture position provides good workspace coverage
Test camera view before running full demos
Return to capture position after manual robot movements
Tip
The capture position should provide a clear view of the entire manipulation area. A top-down view generally works best.
gripper-open
Opens the Robotiq gripper.
Example usage:
gripper-open
Use cases:
Manually releasing grasped objects
Resetting gripper state before demos
Testing gripper functionality
gripper-close
Closes the Robotiq gripper.
Example usage:
gripper-close
Use cases:
Manually grasping objects
Testing gripper functionality
Verifying gripper connection
Visualization
Important
Camera must be plugged in for all commands in this section.
viz-calibration
Visualizes the wrist camera calibration with the robot in Rerun. This shows real-time robot state, camera pose, RGB images, depth maps, and projected point clouds in the world frame. Use this to verify that camera-to-gripper transformation is accurate.
Prerequisites:
Bamboo controller must be running
Camera must be calibrated (run
calibrate-wrist-camfirst)
What it shows:
Robot visualization with live joint positions
Camera coordinate frame (axes near camera mount)
RGB image from wrist camera
Depth map
3D point cloud in world coordinates
Gripper coordinate frame
Available flags:
--rr-spawn / --no-rr-spawn- Spawn Rerun viewer; set to False if connecting to remote visualizer (default: True)--viz-freq FLOAT- Visualization loop frequency in Hz (default: 5.0)--max-time FLOAT- Maximum visualization time in seconds before auto-stopping (default: 60.0)
Example usage:
viz-calibration

# Run for shorter duration at lower frequency
viz-calibration --max-time 10.0 --viz-freq 1.0
Warning
This command logs a lot of data to Rerun. Don’t run it for extended periods - use the --max-time flag to limit duration (default is 60 seconds).
A Rerun window will open automatically. Check that:
Camera frame aligns with the gripper frame
Point cloud geometry looks correct and is in proper scale
Camera frustum visualization makes sense relative to robot geometry
Press Ctrl+C in the terminal to exit.
Tip
Move the robot around (in Programming mode) while this is running to see the point cloud update in real-time and verify calibration across different poses.
viz-gripper-cam
Displays the gripper (wrist) camera feed in an OpenCV window.
Example usage:
viz-gripper-cam
Press q to exit the visualization.
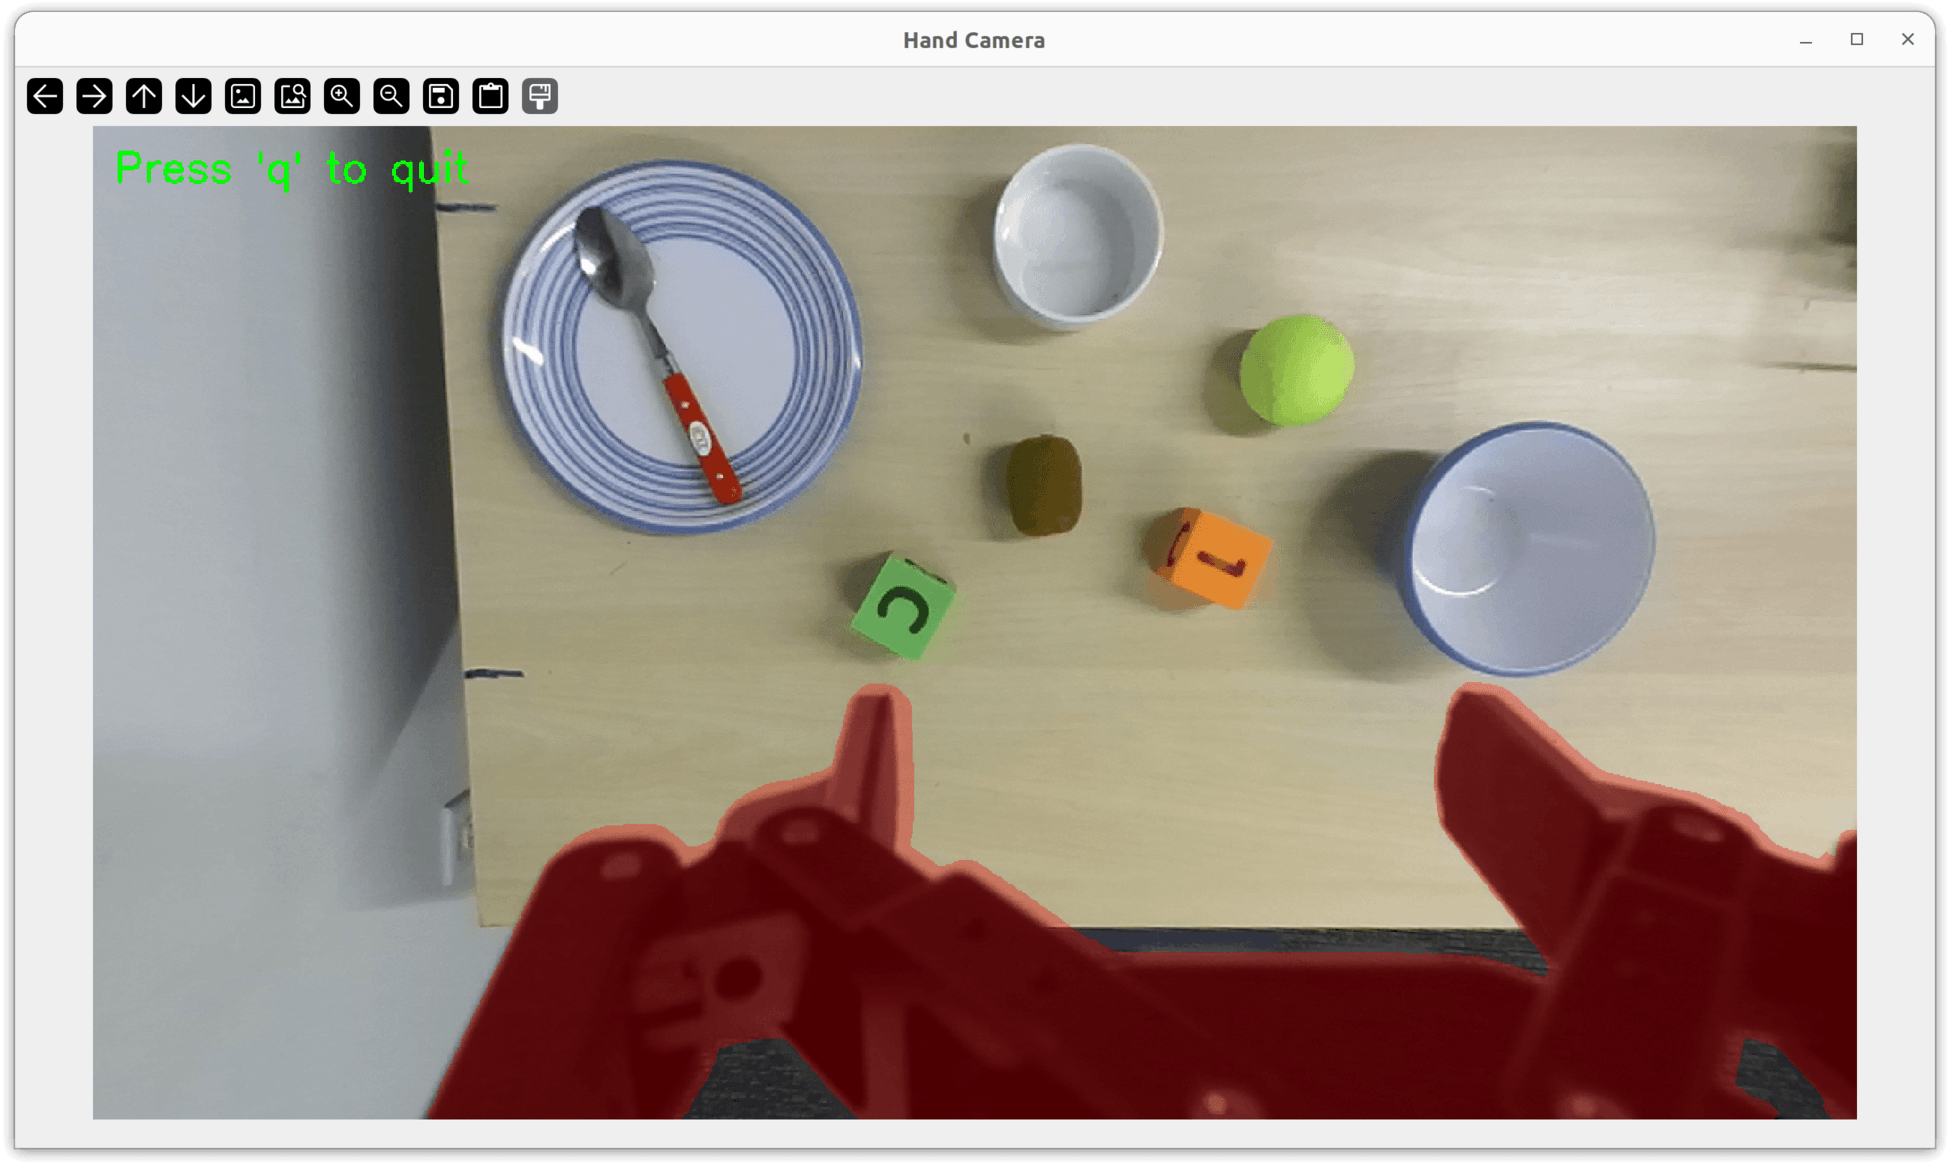
Hand camera feed with the gripper mask overlay (red). Useful for verifying camera connection, checking field of view, and inspecting gripper mask coverage.
Use cases:
Verifying camera connection during initial setup
Checking camera field of view when configuring capture positions
Inspecting gripper mask coverage after running
compute-gripper-mask
viz-scene
Visualizes the scene using the camera (wrist or external). Optionally blends the current camera view with a reference scene image to help reset objects to their initial positions between trials.
Available flags:
--cam-type STR- Camera type to use: “hand” or “external” (default: “external”)--ref-scene STR- Path to reference scene image for blending (optional)--alpha FLOAT- Blending weight for reference image, 0.0 = current only, 1.0 = reference only (default: 0.5)
Example usage:
viz-scene

# Use hand camera instead of external
viz-scene --cam-type hand

# Blend with reference scene image
viz-scene --ref-scene path/to/reference.png
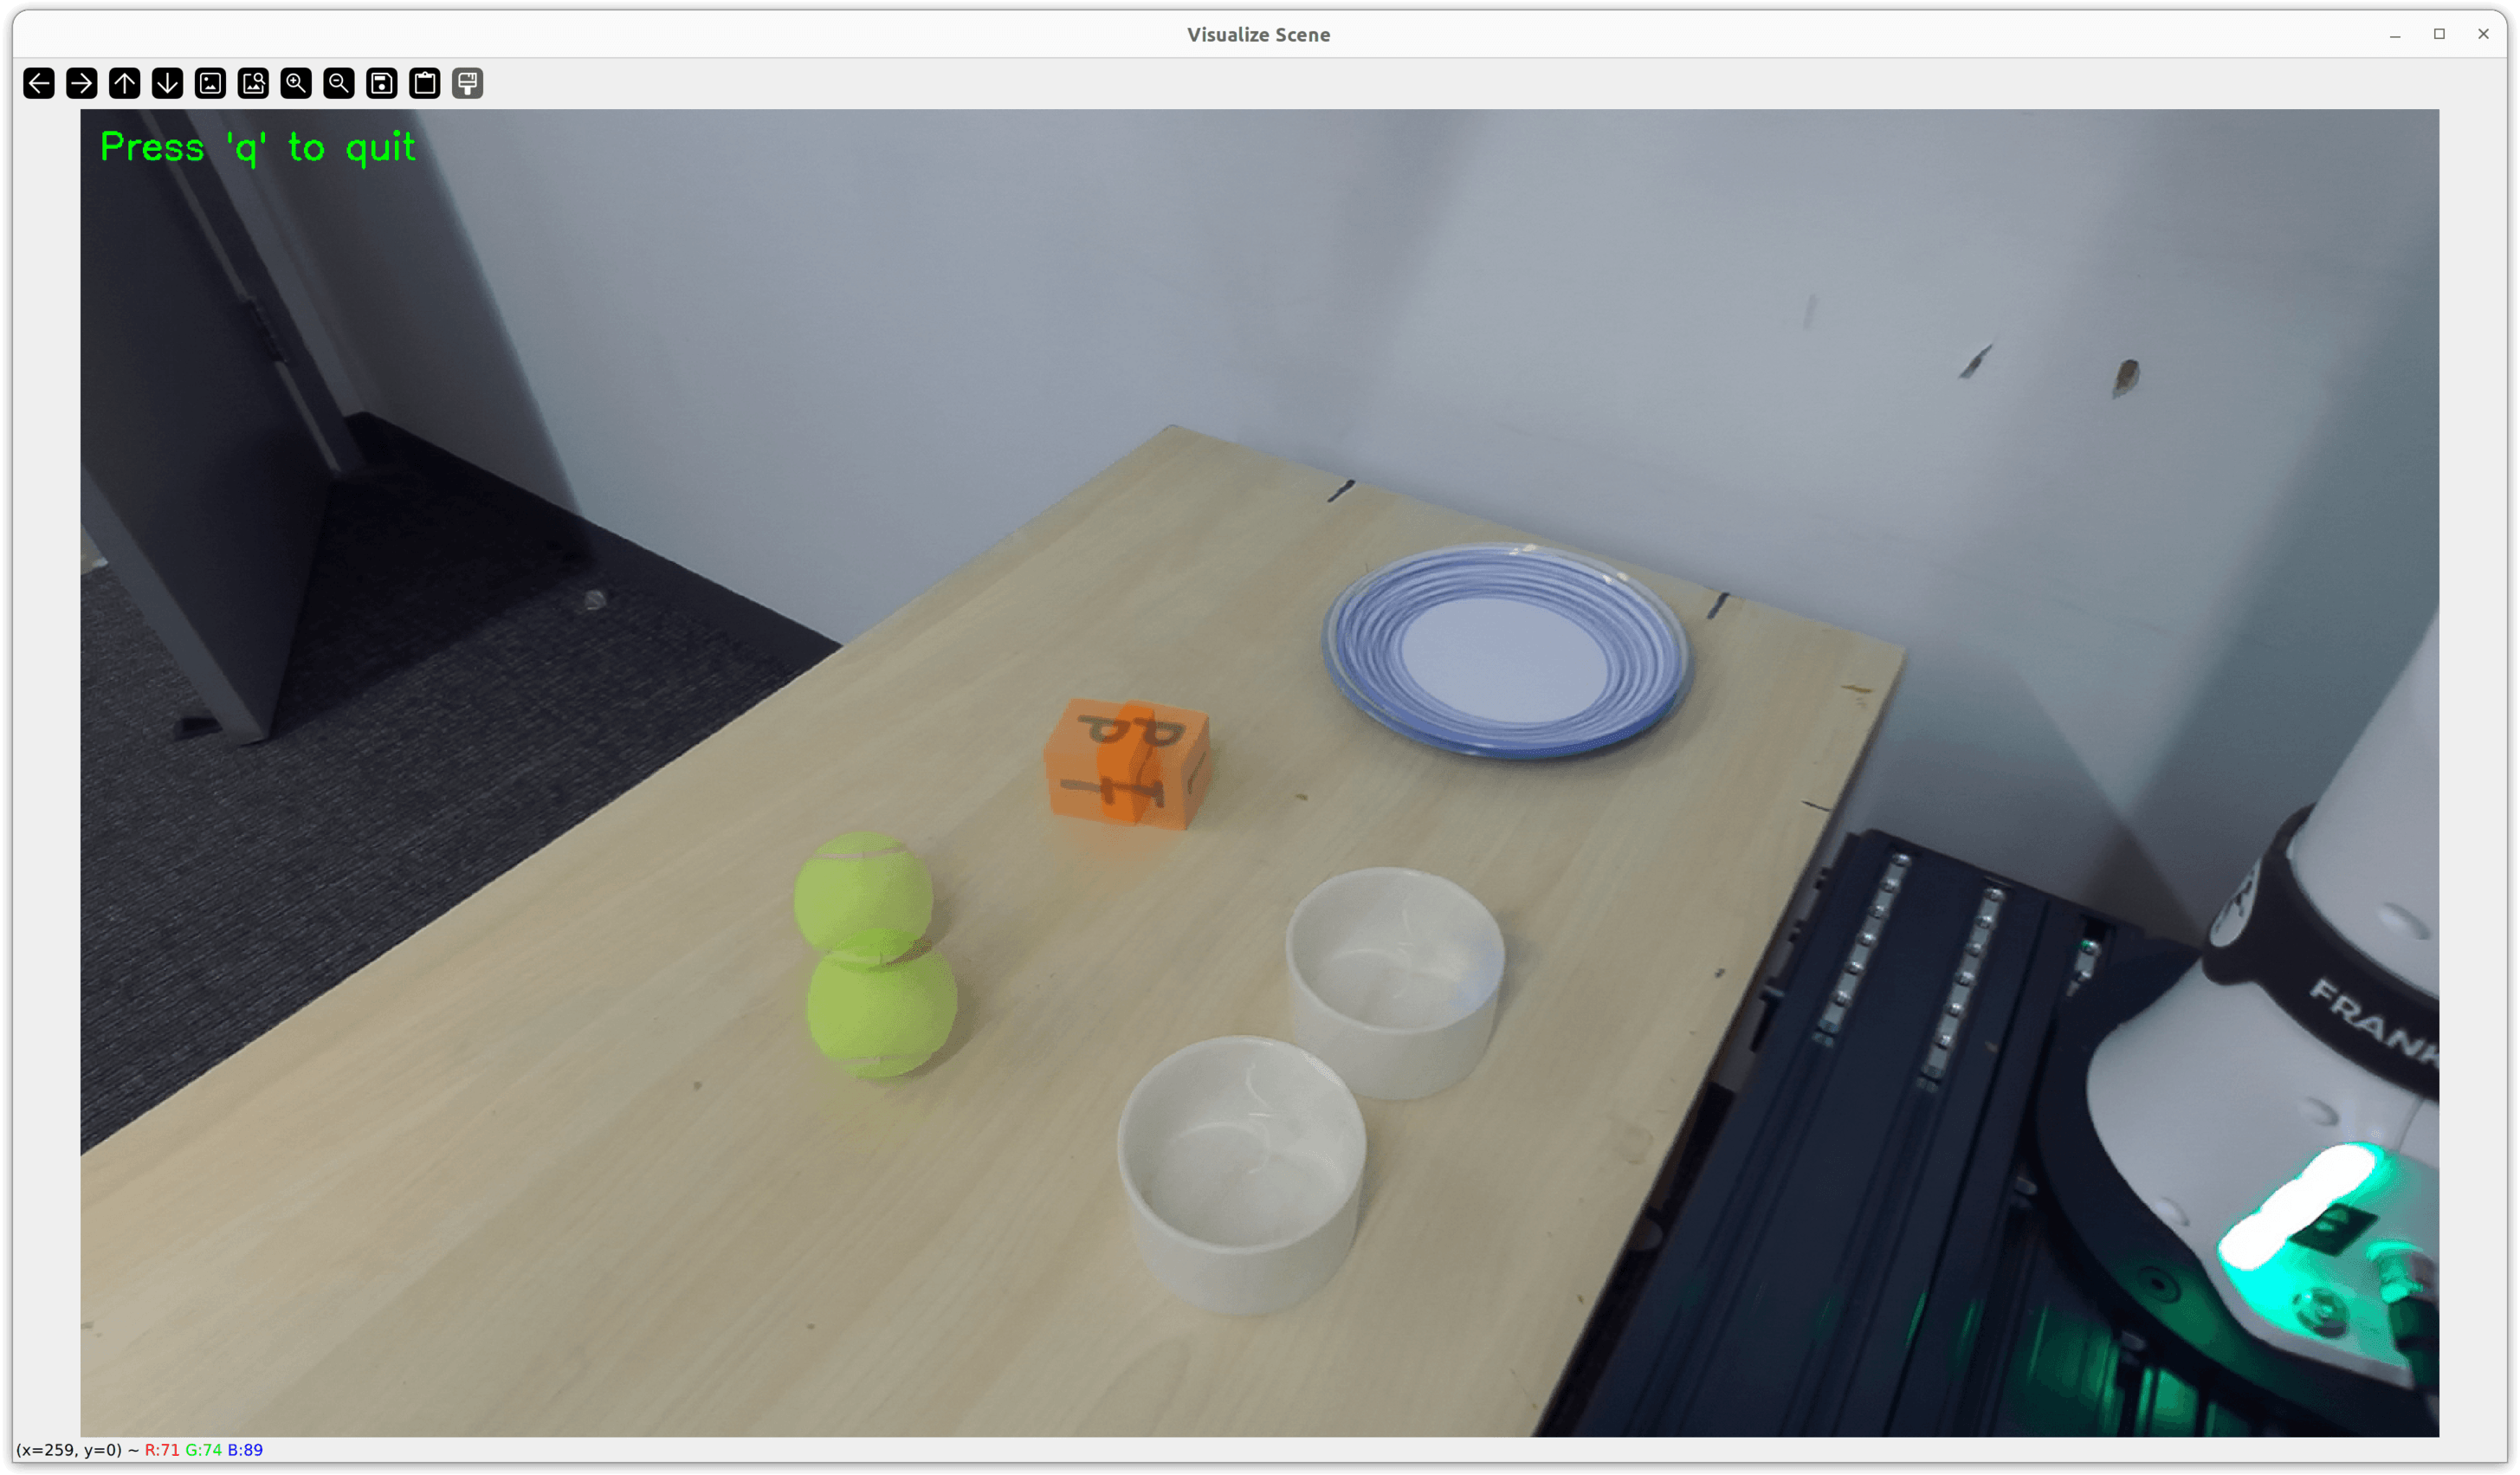
viz-scene blending the current camera view with a reference image to help reset objects to their starting positions.
Use cases:
Inspecting the current workspace before running a demo
Resetting object positions to match a reference scene configuration (with reference image blending)
viz-tiptop-run
Replays and visualizes the outputs of a saved TiPToP run in Rerun. Loads perception data (RGB, depth, point cloud, bounding boxes, segmentation masks, grasps) and optionally plays back the planned trajectory with object poses tracked through pick-and-place actions.
Prerequisites:
A saved TiPToP run directory (contains
metadata.json,rgb.png,tiptop_plan.json, etc.)
Available flags:
--run-dir STR- Path to a saved TiPToP run directory (required)--visualize-grasps / --no-visualize-grasps- Visualize M2T2 grasp candidates (default: True)--visualize-plan / --no-visualize-plan- Animate the TiPToP plan trajectory with object poses (default: True)--num-grasps-per-object INT- Maximum number of grasp candidates to display per object (default: 30)--log-transform-arrows / --no-log-transform-arrows- Log coordinate frame arrows on object transforms (default: True)
Example usage:
# Visualize a run directory
viz-tiptop-run --run-dir tiptop_outputs/eval/2026-01-24_15-30-00/

# Visualize perception only, skip plan animation
viz-tiptop-run --run-dir tiptop_outputs/eval/2026-01-24_15-30-00/ --no-visualize-plan

# Show fewer grasps
viz-tiptop-run --run-dir tiptop_outputs/eval/2026-01-24_15-30-00/ --num-grasps-per-object 10
A Rerun window will open automatically. Use the tiptop_execution timeline to step through the planned trajectory. The cam entity shows the camera pose and image at capture time, and world/ contains all objects and their poses throughout execution.
Note
Plan visualization is skipped if tiptop_plan.json is not found in the run directory (e.g., if planning failed).
Setup and Calibration
tiptop-config
Displays and manages TiPToP configuration settings. This interactive script helps you configure networking (Bamboo controller host/port) and camera parameters for your specific hardware setup.
When to use:
Run this during initial setup to configure TiPToP for your robot and camera hardware. You should run this before attempting to connect to the robot or use cameras.
Example usage:
tiptop-config
The script will guide you through configuration options interactively. All settings are saved to tiptop/config/tiptop.yml.
Note
You can manually edit tiptop/config/tiptop.yml directly if you prefer to modify configuration without the interactive script.
calibrate-wrist-cam
Calibrates the wrist-mounted camera to the robot end-effector frame. This computes the transformation matrix between the camera coordinate frame and the gripper coordinate frame, which is essential for accurate 3D scene reconstruction and manipulation planning.
Prerequisites:
Bamboo controller must be running
Charuco calibration board from DROID setup (or custom printed board)
Verify charuco board parameters (marker size, rows, columns) in
tiptop/scripts/calibrate_wrist_cam.pymatch your physical board
Calibration process:
Run the command - a cv2 window will show the gripper camera feed
Set robot to “Programming” mode in Franka Desk
Manually move robot so the Charuco board is centered in the left stereo frame, 1-2 feet from camera
Set robot back to “Execution” mode
Press y in the cv2 window to start calibration
Wait 2-3 minutes for calibration to complete
Verify calibration data is written to
tiptop/config/assets/calibration_info.json
Example usage:
calibrate-wrist-cam
Important
Re-calibrate if the camera is knocked, cables tug on it, or you notice inaccuracies in manipulation. Regular re-calibration is good practice.
Verification:
After calibration, use viz-calibration to verify the camera frame aligns correctly with the robot gripper frame and point clouds look accurate.
compute-gripper-mask
Computes a binary mask to filter out the gripper from perception outputs using Gemini for detection and SAM2 for segmentation. This mask removes gripper geometry from the projected point cloud, preventing the motion planner from treating the gripper as an obstacle.
Prerequisites:
GOOGLE_API_KEYenvironment variable must be set (used for Gemini detection)Robot should be in a position where the gripper is clearly visible and distinguishable from the background
Example usage:
compute-gripper-mask
You’ll see a cv2 window with the camera feed and the computed mask overlaid in red. If satisfied with the mask, press y to save it. If not, press n and reposition the robot or scene objects to make the gripper more distinct, then run again.
Tip
For best results, ensure good lighting and contrast between the gripper and background. Move any objects that might be confused with the gripper.
Alternative:
If automatic detection doesn’t work well (e.g., gripper isn’t sufficiently visible), use paint-gripper-mask to manually create the mask.
paint-gripper-mask
Interactive tool for manually painting or refining the gripper mask. This is particularly useful for grippers that are hard to detect automatically (e.g., UR5) or when compute-gripper-mask produces unsatisfactory results.
When to use:
Automatic gripper detection with
compute-gripper-maskfails or produces poor resultsYour gripper design makes automatic detection difficult
You want to manually refine an existing mask
Example usage:
paint-gripper-mask
Tip
It’s better to overapproximate the gripper area (paint slightly larger) than underapproximate to ensure all gripper pixels are filtered out.