Getting Started
This guide walks you through setting up and running TiPToP on your DROID hardware setup. You should have already followed the installation instructions. It should take up to 30 minutes to get TiPToP up and fully running.
If you want to run TiPToP in simulation, see Running in Simulation instead.
Start the Bamboo controller server
Important
The Bamboo controller must be running whenever you want to control the robot (including calibration, visualization with robot, and running demos). Stop these servers when you’re done to free resources and ensure safety.
On the control workstation directly networked to the Franka (NUC in the original DROID setup):
Open Franka Desk, enable FCI (Franka Control Interface), and set the robot to Execution mode
Start the Bamboo controller and gripper server. Run these from the top-level directory of where you cloned Bamboo:
bash RunBambooController
Tip
Use the -h flag to see all the options available, such as setting the robot IP (we assume 172.16.0.2), gripper tty interface, etc.
If you are using the built-in Franka Hand (e.g. on a Panda arm), pass --gripper_type franka — no separate gripper server is needed:
bash RunBambooController start --gripper_type franka
The gripper should open and close to activate. Keep the Bamboo controller running for the entire session, then stop them when done.
Configure TiPToP
Important
All TiPToP CLI commands must be run inside the pixi environment. We recommend activating the shell with pixi shell from the $TIPTOP_DIR/tiptop directory, then running commands directly. Alternatively, you can prefix individual commands with pixi run <command>.
All the following instructions should happen on the GPU-enabled workstation under the $TIPTOP_DIR/tiptop
repo.
We first configure TiPToP for your networking setup, robot embodiment, and cameras. Run the following command and follow the instructions in the script:
cd $TIPTOP_DIR/tiptop
pixi shell  # activate tiptop environment
tiptop-config
The script will ask for your robot embodiment, robot host and ports, camera serial numbers, and the URLs for the FoundationStereo and M2T2 perception servers (discussed in more detail in the M2T2 and FoundationStereo sections below). Choose your embodiment from the table below:
Embodiment |
Robot |
Gripper |
Wrist Camera Collision Spheres |
|---|---|---|---|
|
Franka FR3 |
Robotiq 2F-85 |
Included (DROID setup) |
|
Franka Panda |
Robotiq 2F-85 |
Included (DROID setup) |
|
Franka FR3 |
Franka default hand |
Not modeled |
|
Franka Panda |
Franka default hand |
Not modeled |
If using fr3 or panda, you should define wrist camera collision spheres in the respective cuRobo config file in cuTAMP, otherwise the motion planner will not account for the wrist camera.
You can check tiptop/config/tiptop.yml for the full config available.
Verify robot connection and camera
Check you can connect to the robot on the GPU workstation through Bamboo:
get-joint-positions
Check the gripper camera feed is working:
viz-gripper-cam # Press 'q' to exit
See Troubleshooting to debug any problems you may have.
Setup Gemini API Key
Important
TiPToP requires a Gemini API key for vision-language tasks including object detection, task parsing, and gripper detection. You must set this up before running calibration or demos.
Generate an API key following the instructions at https://ai.google.dev/gemini-api/docs/api-key.
Set the GOOGLE_API_KEY environment variable:
export GOOGLE_API_KEY=<your-key>
Hint
Add this to your ~/.bashrc or ~/.zshrc so it persists across sessions.
Define the Static Workspace
Important
Defining workspace obstacles is critical for safe motion planning and collision avoidance. The motion planner uses these obstacles to generate collision-free trajectories.
Edit the workspace configuration under the fr3_workspace method in tiptop/workspace.py to define cuboid representations of static objects
including:
Robot mounting table
Nearby furniture (desks, shelves)
Ceiling
Fixed equipment (laptops, monitors)
Keep-out zones for safety
You can visualize the workspace obstacles with the robot by running:
python tiptop/workspace.py
Iterate on your config until it seems reasonable. It’s better to overapproximate workspace obstacles than underapproximate them.
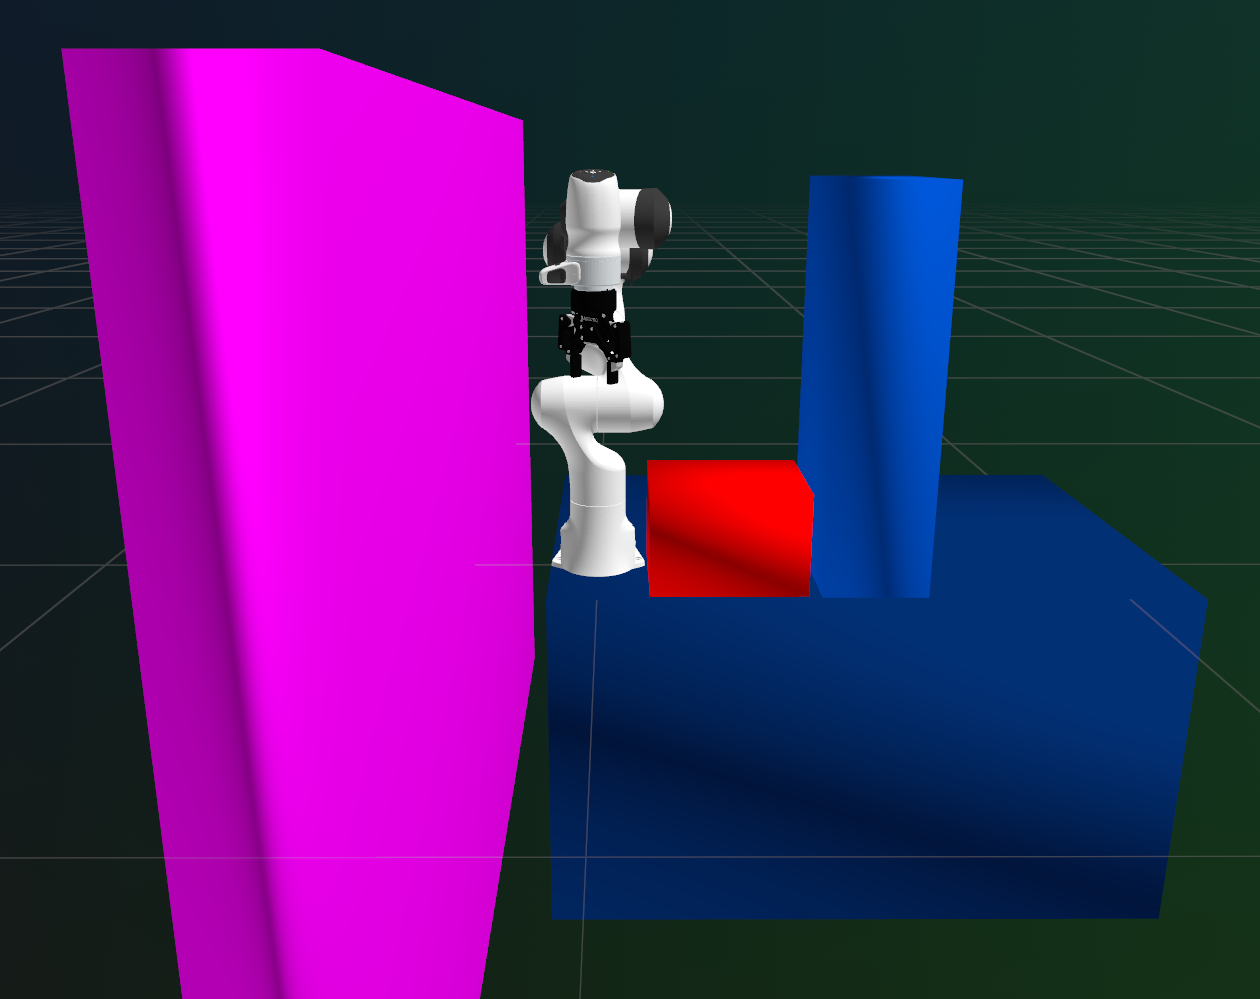
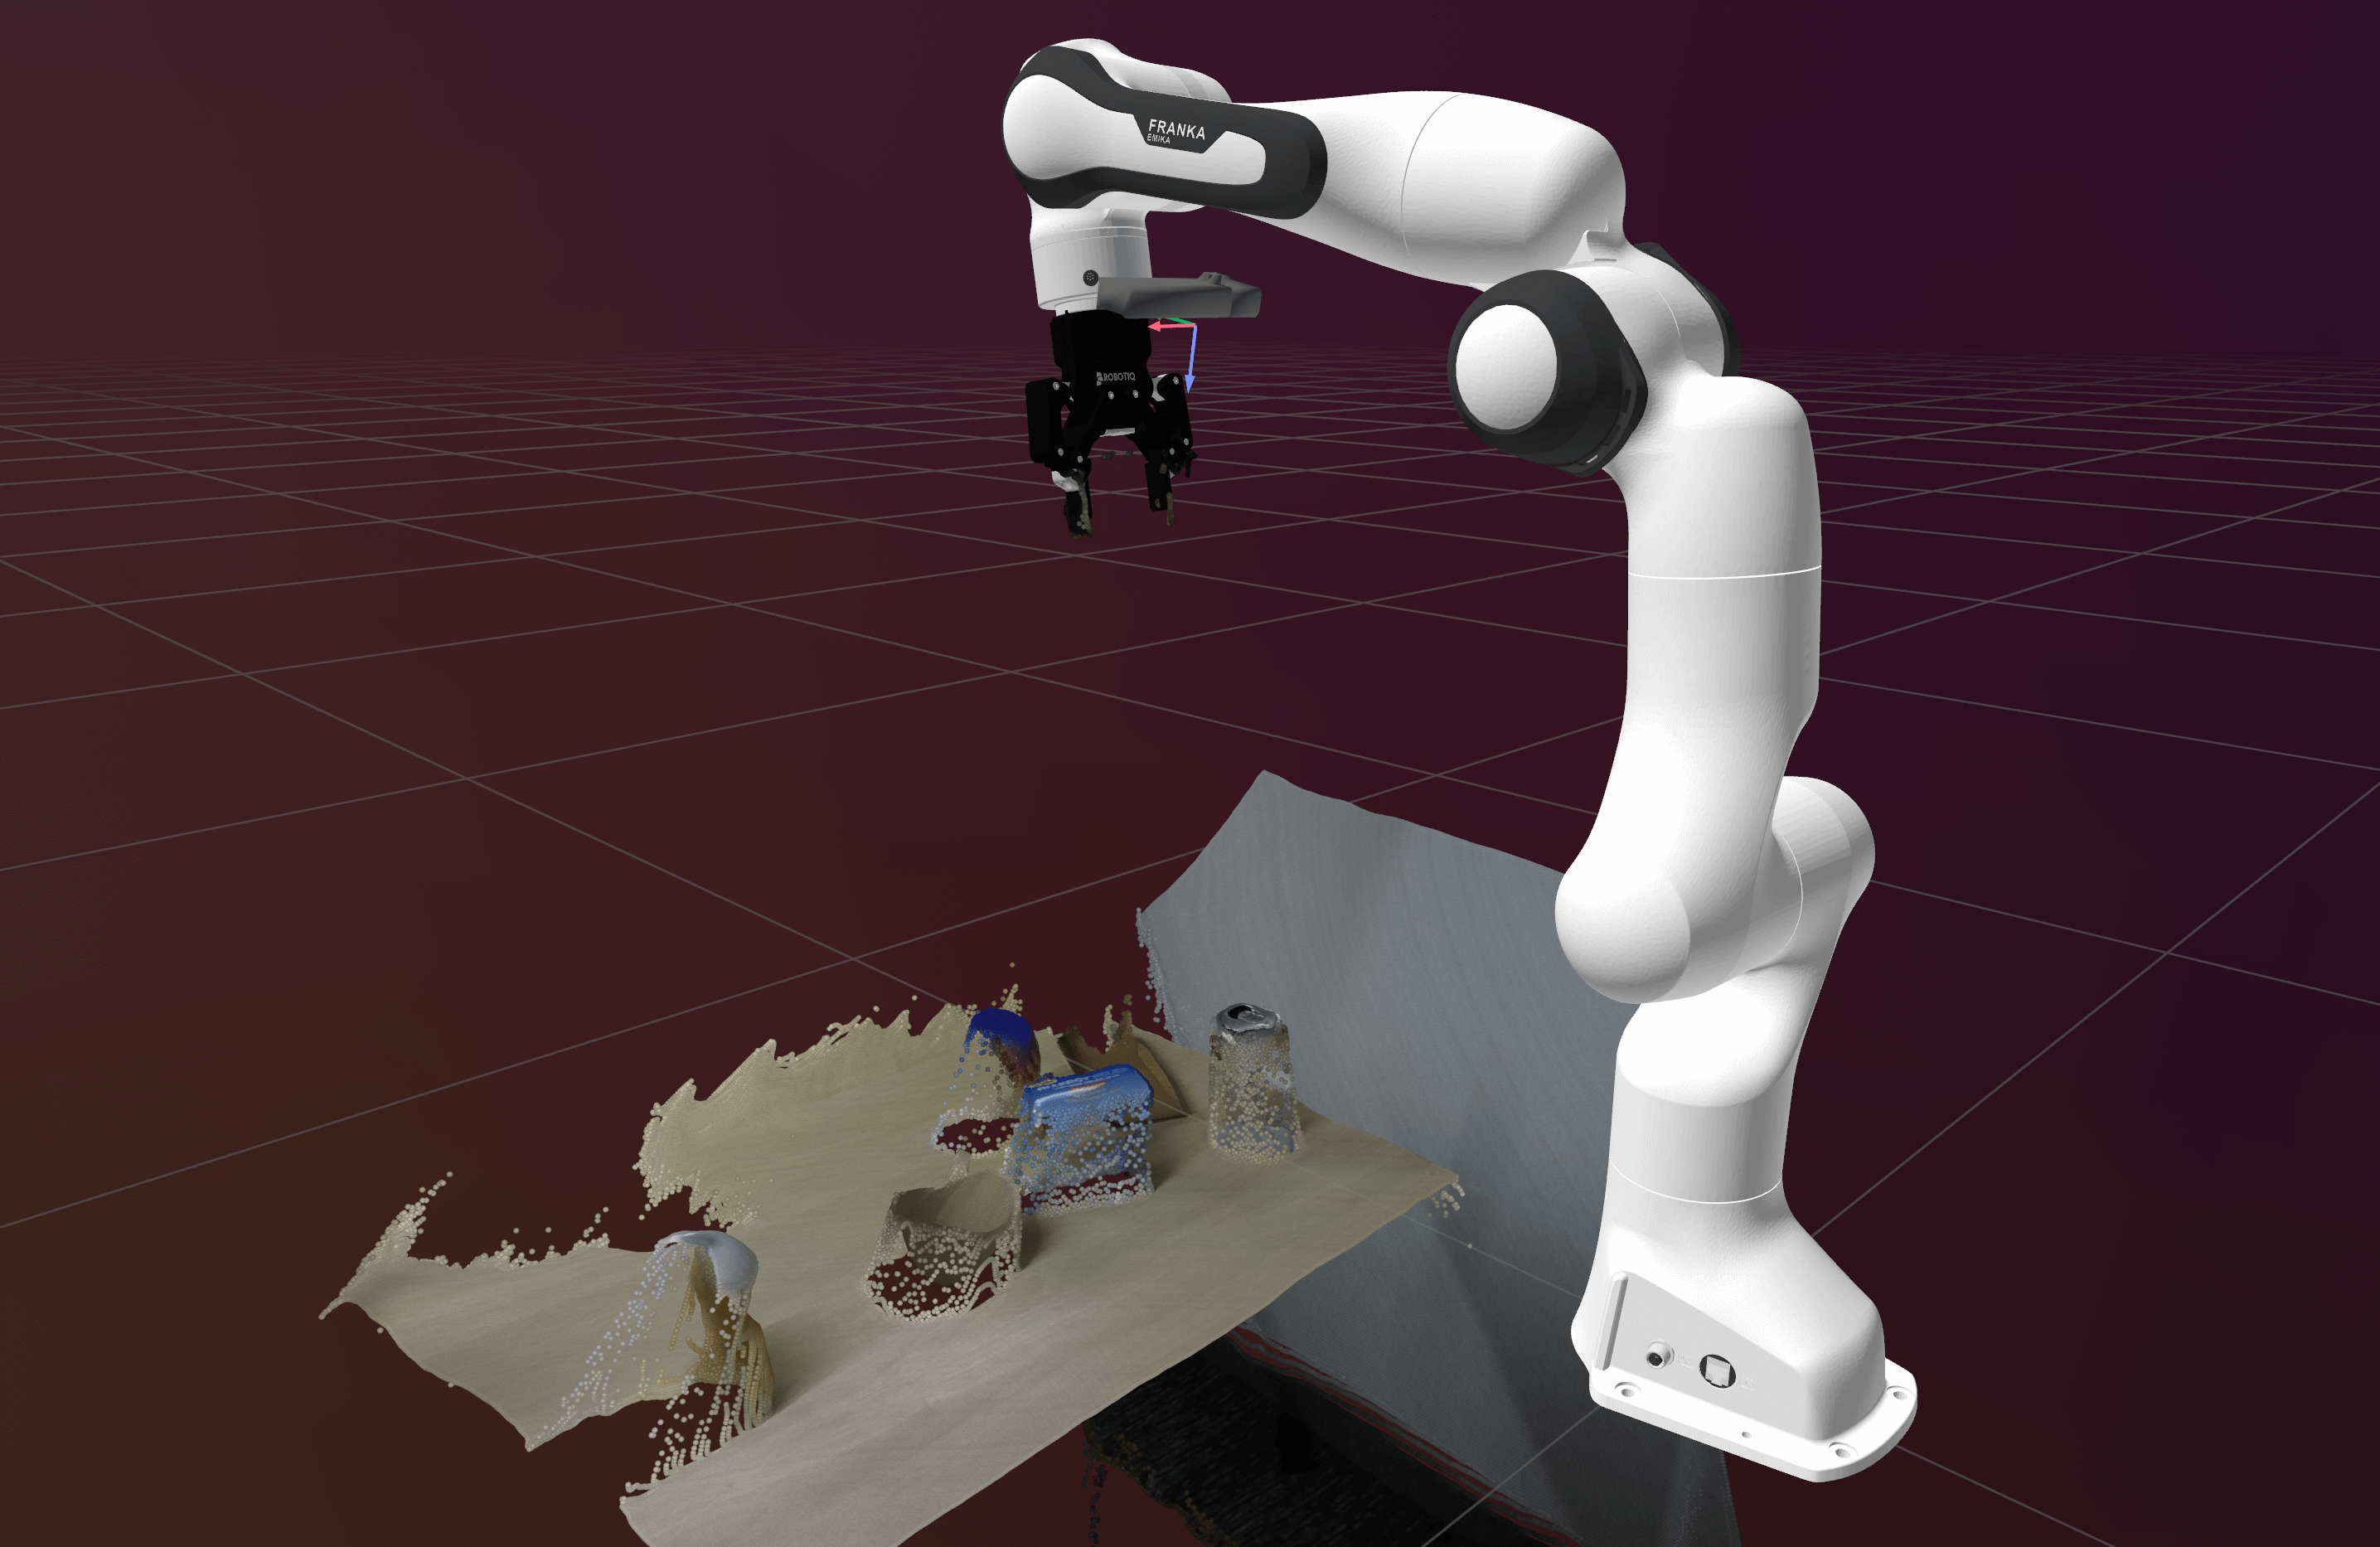
FR3 Workspace for our setup in LIS at MIT. The pink corresponds to the wall, the red the iPad we use for timing, the blue vertical thing is the camera mount, and the dark blue is the robot mounting table.
Configure Capture Joint Positions
TiPToP captures a single image from a fixed joint configuration defined in robot.q_capture in tiptop/config/tiptop.yml. The default configuration assumes a tabletop workspace in front of the robot with a top-down view.
First, check if the default capture position works for your setup:
Warning
The go-to-capture command will move the robot to the capture position. Keep your hand on the e-stop and ensure the area is clear before running it.
Note
If any command is not found (e.g. go-to-capture: command not found), you are likely not inside the pixi shell. Either run pixi shell first, or prefix the command with pixi run (e.g. pixi run go-to-capture).
go-to-capture
viz-gripper-cam  # Check if the camera view covers your workspace
If the default position provides good coverage of your manipulation area, you’re all set! Otherwise, customize it:
Set the robot to Programming mode in Franka Desk
Run
viz-gripper-camto see the camera viewManually move the robot so the entire manipulation area of interest is visible in the camera frame
Keep the robot in that position and run:
get-joint-positions
Copy the printed joint positions and update the
robot.q_capturefield intiptop/config/tiptop.ymlSet the robot back to Execution mode in Franka Desk
Tip
A top-down view generally works best, but front-facing views can work too (we have not tested this thoroughly). Ensure good coverage of your workspace since TiPToP only uses this single view for planning.
Calibrate the Wrist Camera
TiPToP uses the wrist camera to create a object-centric 3D scene representation which it uses to plan. This requires the wrist camera to be calibrated so we know the transformation between the end-effector and the camera.
We assume you have the calibration board from the DROID setup. If not, generate and print your own, though the calibration accuracy may vary (https://calib.io/pages/camera-calibration-pattern-generator)
Run the calibration script
Carefully verify the charuco board parameters (marker size, rows, columns, etc.) are correct in
tiptop/scripts/calibrate_wrist_cam.py. If not, edit them.Run
calibrate-wrist-cam. A cv2 window will appear with a feed of the gripper wrist camera.Set the robot to “Programming” mode in Franka desk and manually move it so that the Charuco board is centered within the left stereo pair frame, approximately 1-2 feet away from the camera. Example screenshot shown below.
Set the robot back to “Execution” mode in Franka desk. Then, in the cv2 window press the y key to continue calibration
The calibration should start and take 2-3 minutes. Let it do its thing and write the calibration into
tiptop/config/assets/calibration_info.jsonCheck that it’s indeed written the calibration into that JSON file.
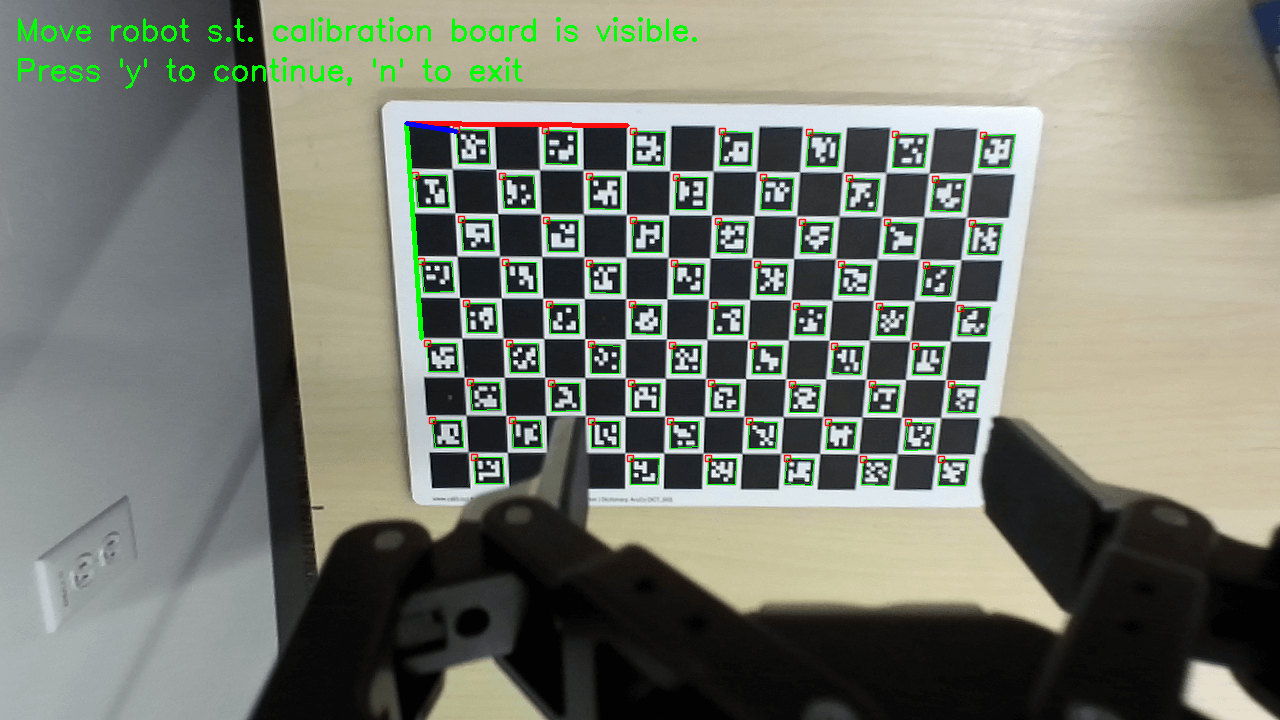
Calibration visualization screen.
Note
You should re-calibrate the camera if it has been knocked by any objects or obstacles, or the cable has tugged on it. Generally, it’s good practice to re-calibrate often to avoid any downstream issues.
Compute the gripper mask
We compute a gripper mask to remove any depth predictions of the gripper from the projected point cloud. Note this uses Gemini to detect the gripper, so make sure you set up your API key following the instructions earlier. Run:
compute-gripper-mask
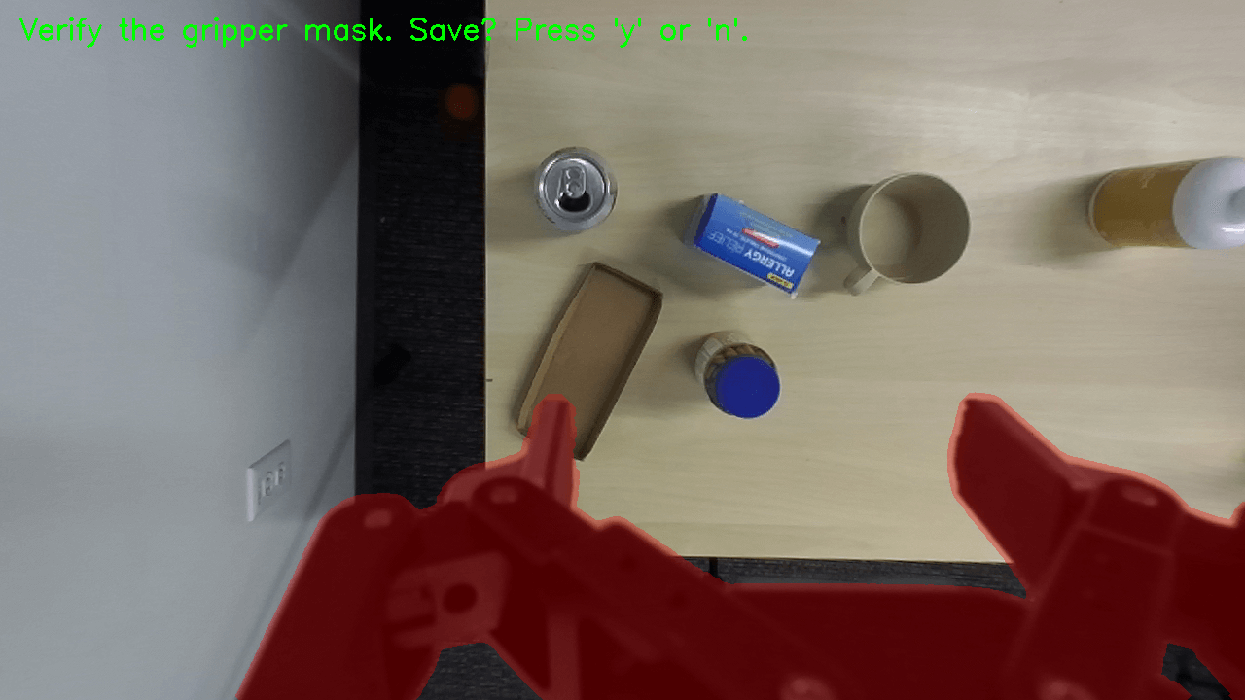
Visualization of the cv2 window when you run compute-gripper-mask.
If you are satisfied with the mask (overlaid in red), then save it with y key. Otherwise, hit n. Move the robot or objects in the scene so the gripper can be clearly differentiated from the scene, then run the command again.
Alternative: Manual mask painting
If the automatic detection doesn’t work well (e.g., gripper isn’t sufficiently visible or distinct), you can manually paint the gripper mask:
paint-gripper-mask
This opens an interactive tool where you can:
Left-click and drag to paint the mask
Press c to clear any existing mask
Press e to toggle between draw and erase modes
Press +/- to adjust brush size
Press f to fill holes, d to dilate
Press y to save when done
This is particularly useful for grippers that are hard to detect automatically (e.g., UR5).
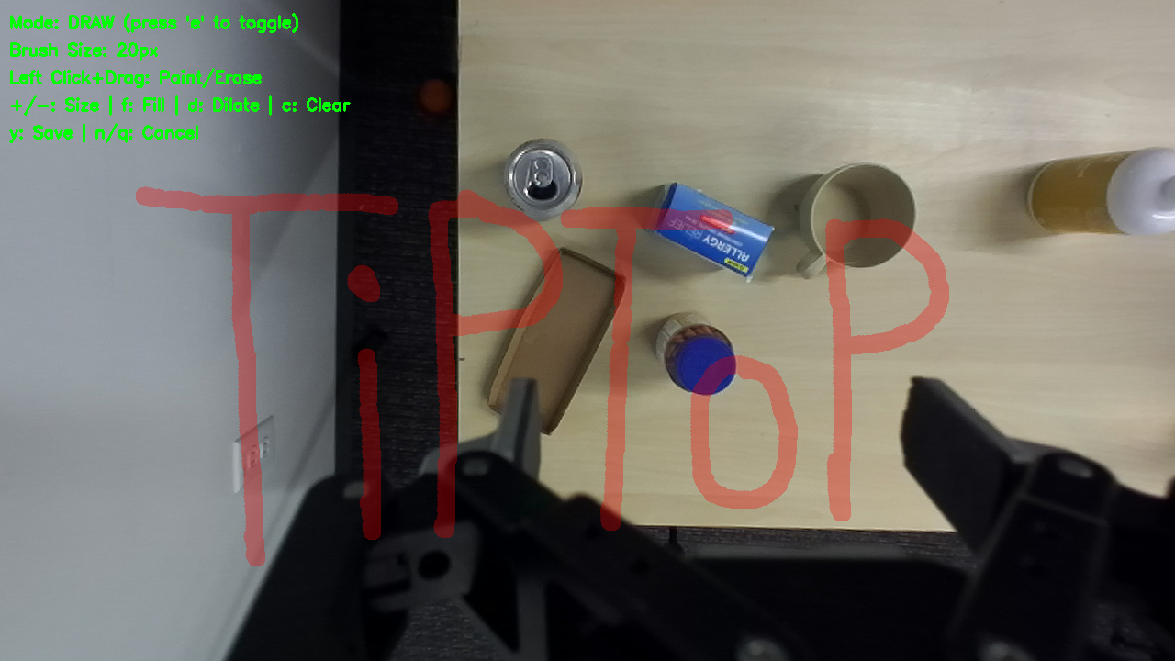
Visualization of the cv2 window when you run paint-gripper-mask. Here, we painted in ‘TiPToP’ just for fun :)
Visualize and verify the calibration
Make sure you’re in a tiptop pixi env shell, then run:
viz-calibration
A Rerun visualization window will appear. Check that the camera frame (coordinate axes near the camera mount) aligns correctly with the robot gripper frame and the point cloud looks correct. The ultimate verification will come when we run some demos.
Visualization of the robot and the scene point cloud when you run viz-calibration.
Run TiPToP
Attention
Cable management for both the gripper and camera is important. Because TiPToP uses cuRobo as a motion planner under the hood, it may generate large displacements in joint angles which may cause strains on the cable if not properly managed.
A workaround is to set the time_dilation_factor in the tiptop/config/tiptop.yml file to be low (e.g., 0.2) and keep
an eye on the robot and e-stop.
While you can run TiPToP with poor cable management, this requires more active observation by the robot operator.
With configuration and calibration complete, you’re ready to run the full system!
Start the perception servers
M2T2 and FoundationStereo run as HTTP microservices. Start them before running TiPToP, either on the same machine or on a separate GPU workstation (as discussed in Installation).
In one terminal, start the M2T2 server (default port: 8123):
cd $TIPTOP_DIR/M2T2
pixi run server
In another terminal, start the FoundationStereo server (default port: 1234):
cd $TIPTOP_DIR/FoundationStereo
pixi run server
TiPToP needs to know where these servers are running. If you haven’t already, run tiptop-config and update the FoundationStereo and M2T2 URLs when prompted — the defaults assume localhost, so you only need to change them if the servers are on a separate machine.
You can also edit tiptop/config/tiptop.yml directly:
perception:
  foundation_stereo:
    url: "http://<host>:1234"

  m2t2:
    url: "http://<host>:8123"
TiPToP checks server health at startup and will report an error if it cannot reach them.
Keep the servers running for the duration you want to run the demo. Don’t forget to stop them afterwards to free up GPU memory.
Configure SAM2 segmentation
SAM2 is installed as part of the standard pixi environment (via the SAM-2 dependency in pyproject.toml) and can run in two modes. Set the mode in tiptop/config/tiptop.yml:
perception:
  sam:
    mode: local    # or "remote"
    url: http://localhost:8000  # only needed for remote mode
Local mode — SAM2 runs in-process, directly inside the main TiPToP process. The model checkpoint (sam2.1_hiera_large.pt) is downloaded automatically on first use to the TiPToP cache directory. No extra server is needed, but SAM2 will consume GPU memory in the main process alongside cuRobo.
By default, the sam2.1_hiera_l config is used. You can override this with the SAM2_CONFIG environment variable before running TiPToP:
export SAM2_CONFIG=configs/sam2.1/sam2.1_hiera_l.yaml
Remote mode — SAM2 runs as a separate HTTP server. This is useful if you want to offload SAM2 to a different machine (e.g., a GPU workstation separate from the one running cuRobo), or to keep GPU memory usage isolated. The server can run on the same machine or on a separate machine on the network — just update the url field in tiptop.yml accordingly.
To start the server, first install the server dependencies, then run the start-sam-server CLI command:
# Install server extras (fastapi, uvicorn, pydantic) — only needed once
pip install -e ".[sam-server]"

# Start the SAM2 server (download the checkpoint first if needed)
start-sam-server \
    --checkpoint /path/to/sam2.1_hiera_large.pt \
    --config sam2.1_hiera_l \
    --host 0.0.0.0 \
    --port 8000
The server exposes a /health endpoint (checked during TiPToP warm-up) and a /segment endpoint that accepts bounding boxes and returns segmentation masks.
Run the TiPToP demo without executing on the robot
We first want to try out TiPToP without executing plans on the real robot and with cuTAMP planning visualization. Run the command below. Note that this will move the robot to the capture joint positions, so make sure you have defined your workspace following the instructions above and keep humans out of the vicinity.
cd $TIPTOP_DIR/tiptop
pixi shell  # drop into tiptop environment
tiptop-run --cutamp-visualize --no-execute-plan
The system will do some warmup and check the health of the perception servers. Once ready, you’ll see a command-line interface prompting for task instructions.
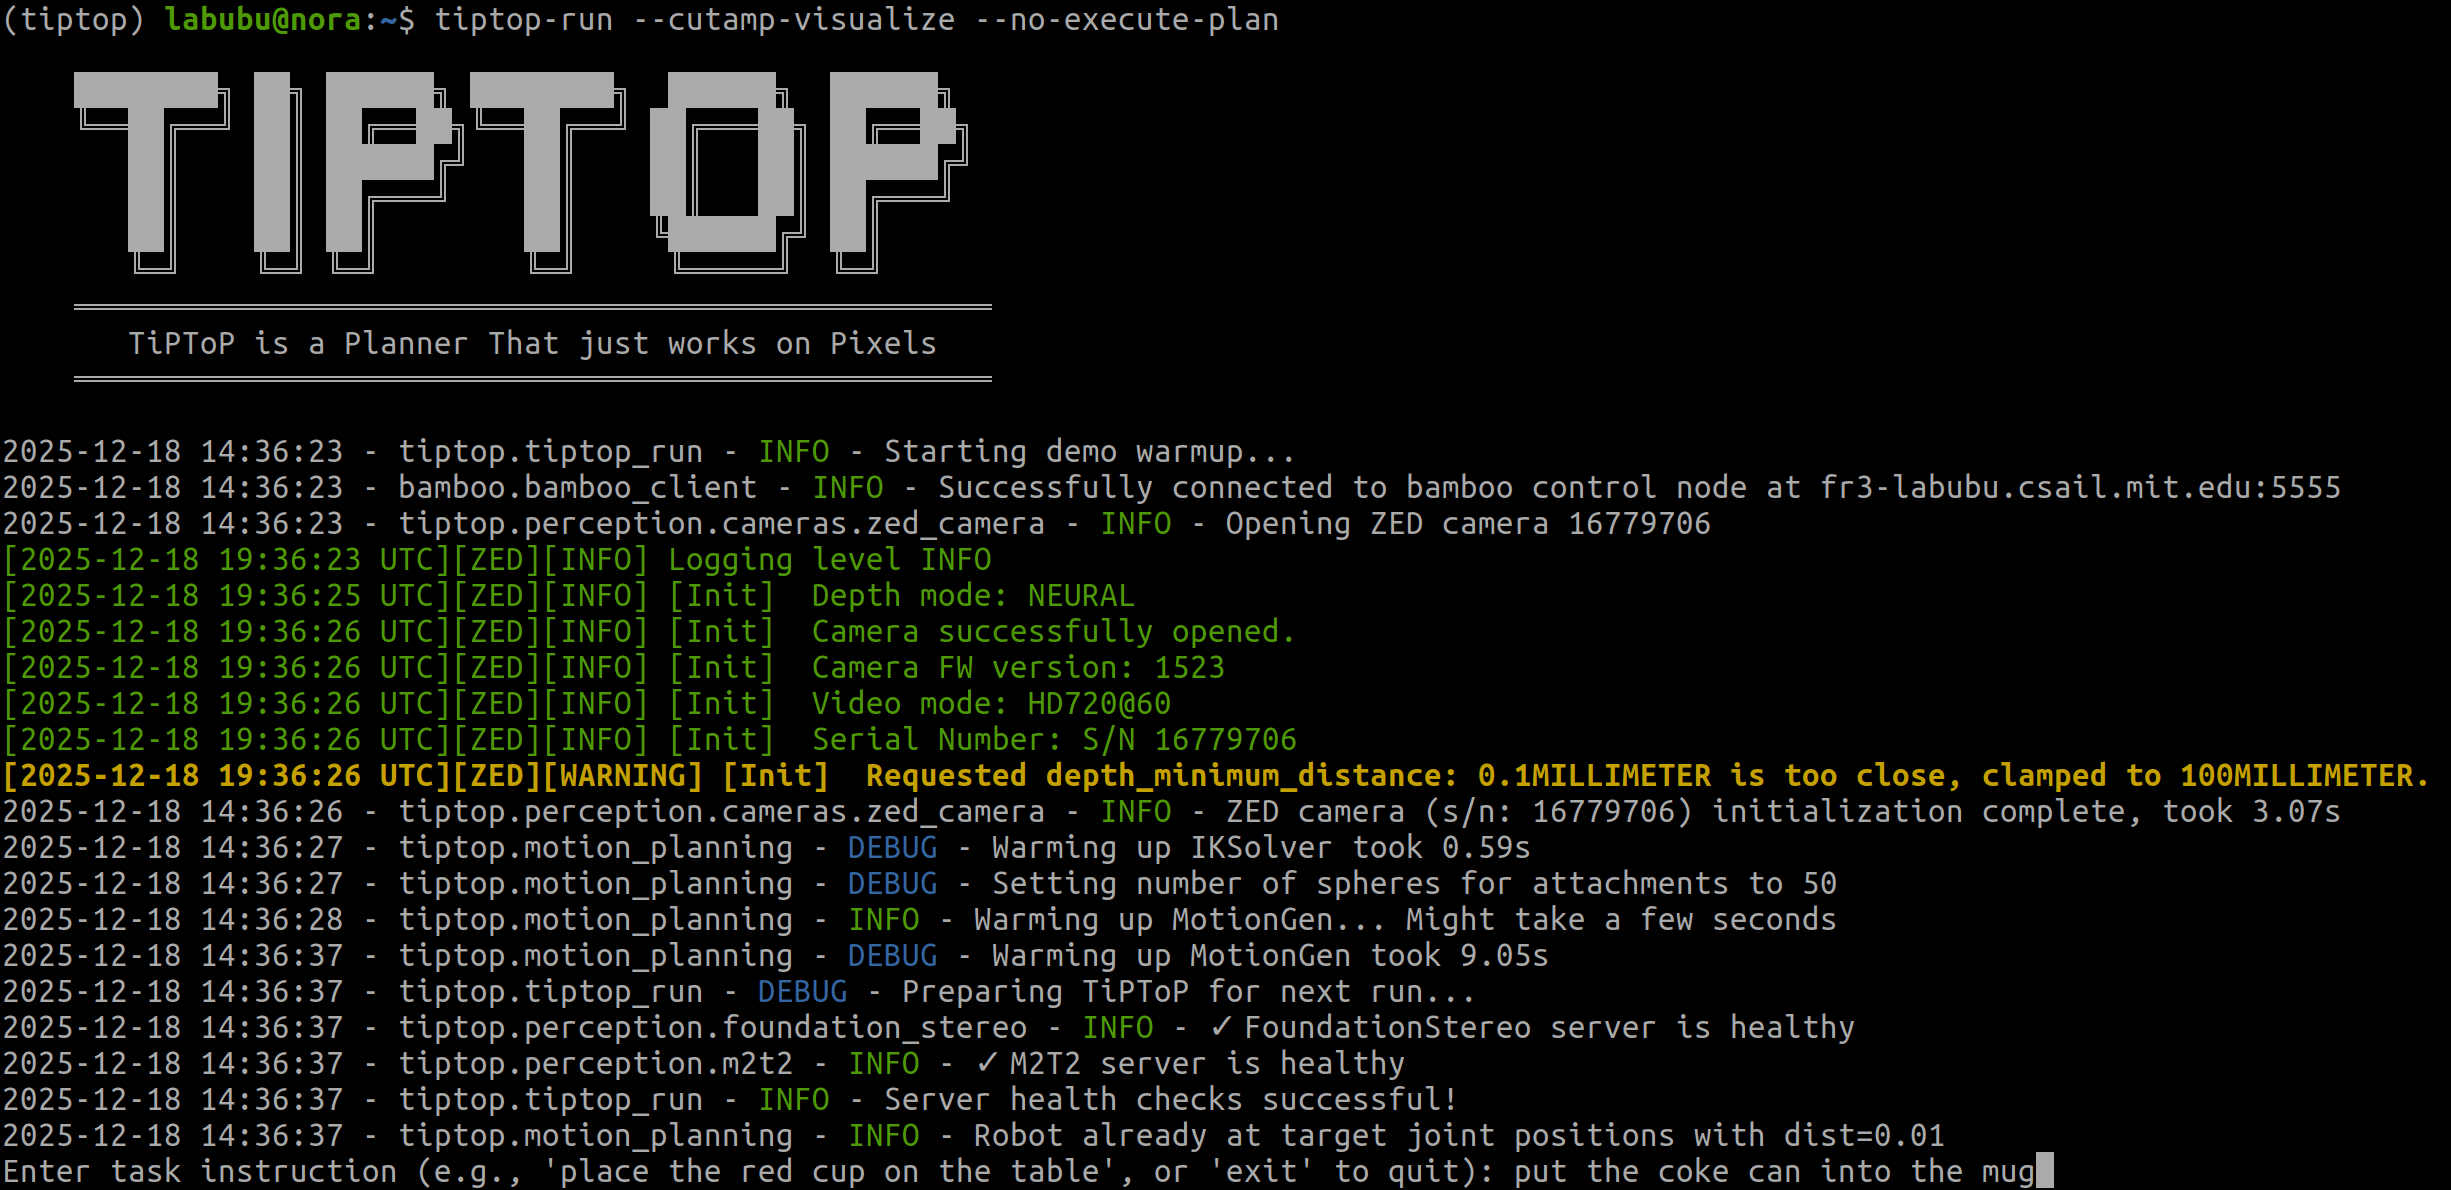
Command line output when you run tiptop-run.
Enter your instruction then press the enter key. TiPToP will run its perception and planning pipeline and log the results and visualizations to Rerun. Note that TiPToP currently only supports pick and place.
Open Rerun (it is automatically spawned) and check the outputs for sanity. Crucially, check that the motion
plans look reasonable (do this in the “tiptop_demo” recording under the curobo_idx timeline (use the largest idx as
that’s the successful plan). The short video below shows how you can check TiPToP outputs in Rerun:
Run the TiPToP demo and execute on the robot
The tiptop-run command executes on the robot by default and disables cuTAMP Rerun visualization (as it significantly
slows down planning). Keep your hand on the E-stop just to be safe!
tiptop-run
TiPToP will report failure if it cannot find a valid plan or if the vision-language model determines the task is infeasible.
Hint
Use the -h or --help flag to see options for the tiptop-run script. For example, you can record videos of trials with the external camera using tiptop-run --enable-recording.
Examples of good instructions:
See the TiPToP website for examples of things we expect to work:
put the apple into the box
pack the fruits onto the plate
serve me two healthy snacks
put the ball away in the cup
throw the coke cans into the empty box
You can try being as ambiguous or as specific as you want.
Examples of bad instructions:
pick up the apple (TiPToP currently requires a pick and a place, not just a pick)
i like chips
pull the pin out
put the apple to the left of the box (TiPToP currently does not support spatial constraints)
Please open an issue in the GitHub repository if you have any issues. Happy TiPToPing!
If you encounter any issues, see the Troubleshooting page for solutions to common problems.