Installation
This guide will help you install TiPToP on your system. We expect this to take around half an hour.
These instructions are tailored for the DROID hardware setup, with a Franka FR3 arm and corresponding control workstation and GPU (compute workstation). We have also tested it on a Franka Panda arm.
We have tested these instructions on Ubuntu 20.04, 24.04 successfully.
Control Workstation Installation
We install our controller on the control workstation that is directly networked to the Franka arm with the real-time kernel. This corresponds to the NUC in the original DROID hardware setup.
Installing Bamboo
Expected installation time: 10 minutes
Bamboo is our controller which is able to precisely follow joint position trajectories.
Pre-requisites
Ensure that the
libfrankasystem requirements are satisfiedEnsure that the
libfrankadependencies are installedIf using libfranka >= 0.14.0: Install Pinocchio following the libfranka dependency instructions before running the installation script
If using a Robotiq gripper: Make sure you have set the inertial parameters for the Robotiq gripper in Franka Desk. You should have already done this when setting up DROID. See the DROID instructions. This step is not required if you are using the built-in Franka Hand.
Install the Controller
git clone https://github.com/chsahit/bamboo.git
cd bamboo

# Follow the instructions in the script
bash InstallBambooController
Note
This script builds libfranka locally and will not override any system installations. The installation script may request sudo privileges to add user groups and install system packages. You will be prompted before any sudo commands are executed.
You will be prompted to enter the version of libfranka to install. This can be determined by:
Checking the FCI version in the Franka Desk (under Settings > Dashboard > Control) and then consulting the FCI Compatability Table for a compatible
libfrankaversionChecking what libfranka versions you already have in other projects, you could run:
locate libfranka.so
Important
If groups are added during installation, you must log out and log back in before moving onto the next step.
Verify the installation
Start the control node (and gripper server, if using a Robotiq gripper). Use the -h flag to see all available options, such as setting the robot IP (we assume 172.16.0.2):
bash RunBambooController
Note
If you are using the built-in Franka Hand (e.g. on a Panda arm), pass --gripper_type franka — the gripper is managed directly by the C++ control node and no separate gripper server is needed:
bash RunBambooController start --gripper_type franka
In a new terminal, run the following:
Warning
The test script does not do any collision checking, so make sure the area around the robot is clear and the robot is not near any joint limits.
conda activate bamboo

# Test the robot
python bamboo/examples/joint_trajectory.py

# Test the gripper, you should see the gripper open and close.
# Use --gripper-type franka if you're using the Franka gripper.
python bamboo/examples/gripper.py
If everything works correctly, you can stop the control node and gripper server with:
bash RunBambooController stop
GPU Workstation Installation
The main TiPToP package (including cuRobo and cuTAMP) must be installed on the GPU machine that is connected to the ZED cameras. In the original DROID hardware setup, this is the GPU laptop.
M2T2 and FoundationStereo can be installed on the same machine as TiPToP. However, if you’re using the DROID GPU laptop and have a separate GPU workstation available, we recommend installing M2T2 and FoundationStereo on that workstation to improve inference time.
We use separate environments for each component to ensure ease of installation and no compatibility issues. We expect the entire installation in this section to take up to 25 minutes on a standard 1Gbps connection.
Pre-requisites
Software and Hardware Requirements:
Ubuntu 20.04+ or equivalent (may work with Ubuntu 18.04, though untested). Check your version with
lsb_release -a.Workstation with NVIDIA GPU with CUDA 12.0+ (we tested on RTX 3080, 3090, and 4090 with no issues). For CUDA < 12, we do not offer explicit support, though you can likely get it working by modifying the
pixi.tomlfiles in the repos to use an older CUDA version for PyTorch, CUDA toolkit, etc.ZED SDK installed at
/usr/local/zed(see ZED SDK installation). This is only required if you are using ZED cameras. We suggest you install ZED SDK 5.0+.Disk space: Approximately 50GB total (17GB for TiPToP/cuRobo/cuTAMP + 13GB for M2T2 + 20GB for FoundationStereo). Check available space with
df -h.
Install pixi
We use pixi to manage the Python environment and dependencies for TiPToP. This dramatically simplifies installation compared to manual conda/pip setup.
If you don’t already have pixi installed, follow these instructions:
curl -fsSL https://pixi.sh/install.sh | bash

# Restart your shell or run:
source ~/.bashrc  # or ~/.zshrc depending on your shell
Verify pixi is installed:
pixi --version
Hint
For autocompletion support for pixi in your shell, see the pixi autocompletion instructions.
Set the TIPTOP_DIR environment variable
Set the TIPTOP_DIR environment variable to the directory where you want to install TiPToP and its dependencies. For example:
export TIPTOP_DIR="$HOME/tiptop"
mkdir -p $TIPTOP_DIR
Hint
The export command only sets the variable for the current shell session. To make it persistent across sessions, add the export line to ~/.bashrc (for bash) or ~/.zshrc (for zsh) depending on your shell.
After completing the installation following the instructions below, your directory structure should look like:
$TIPTOP_DIR/
├── tiptop/
├── M2T2/
└── FoundationStereo/
Installing TiPToP, cuRobo and cuTAMP
Estimated installation time: 10-15 minutes
Important
The pixi environment and code requires around 17GB of disk space.
These installation instructions must be run on the GPU machine that is connected to the ZED cameras. This is the GPU laptop in the original DROID hardware setup.
# Clone the repository
cd $TIPTOP_DIR
git clone git@github.com:tiptop-robot/tiptop.git
cd tiptop

# Install Python dependencies
pixi install

# Setup and install cuRobo and cuTAMP (this may take 5-15 minutes)
pixi run setup-planners

# Install ZED Python API (if you are using ZED cameras)
pixi run install-zed
Caution
We officially support ZED SDK 5.0+, which is compatible with numpy 2. If you are using ZED SDK 4.x, you may see errors like ValueError: numpy.dtype size changed, may indicate binary incompatibility. Whether and how to resolve this depends on your specific setup. See the troubleshooting section on this page for guidance.
Next, verify the installation to make sure everything is working as expected:
# Validate cuTAMP is installed and working. You should see a Rerun screen open
pixi run cutamp-demo --motion_plan

# Run tiptop-run command with help flag to check imports all work
pixi run tiptop-run -h
The cuTAMP demo should open a Rerun visualization window that looks like this. You can play the motion plan to check the result.
Installing M2T2
Estimated installation time: 5 minutes
M2T2 is used to generate 6-DOF grasps from a point cloud. We run it as a microservice (HTTP server).
Important
The pixi environment, code and checkpoints for M2T2 require around 13GB of disk space.
The checkpoints we use for M2T2 correspond to the non-commercial version. For commercial licensing, reach out to NVIDIA.
If you’re using the DROID GPU laptop, we recommend installing M2T2 on a separate GPU workstation if available to improve inference time. Otherwise, install it on the same machine where you installed TiPToP. Follow the instructions below to install M2T2:
# Clone the repository
cd $TIPTOP_DIR
git clone https://github.com/williamshen-nz/M2T2.git
cd M2T2

# Install dependencies (this may take 2-5 minutes)
pixi run setup

# Download pretrained weights
pixi run download-weights
Next, run the demo script to ensure everything is set up correctly.
# Run the full demo with meshcat visualization (runs m2t2_demo.sh)
pixi run demo
Hint
To run on a specific GPU, prefix the command with CUDA_VISIBLE_DEVICES=<gpu-id>.
For example, CUDA_VISIBLE_DEVICES=0 pixi run demo restricts execution to GPU 0. Use nvidia-smi to list GPUs and their IDs.
Go to Meshcat at http://127.0.0.1:7000/static/ in your browser and wait to see the grasp predictions. It should look like the figure below.
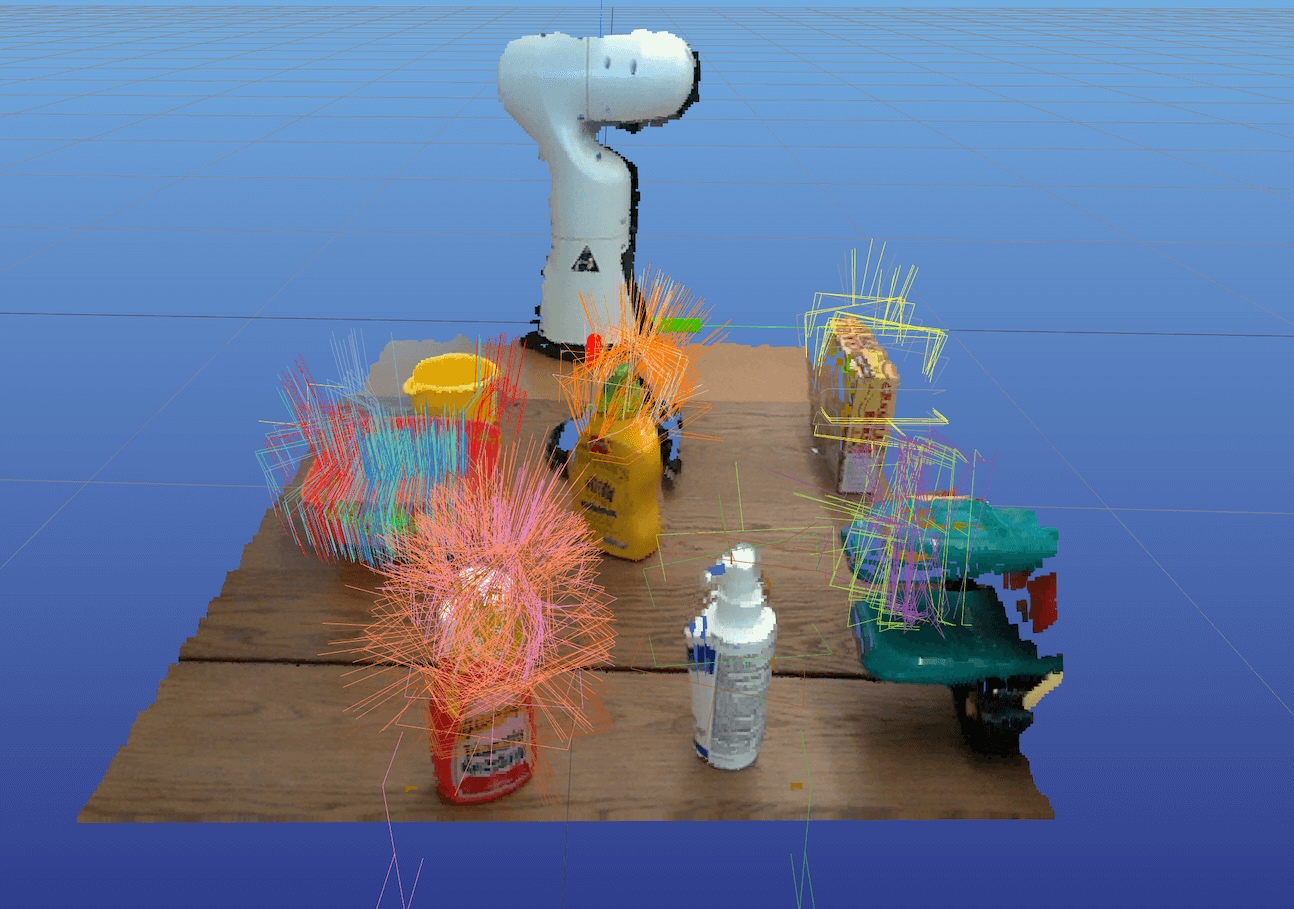
M2T2 grasp visualization
The demo script runs in a tmux session and automatically attaches you to it. After you’ve verified it’s working, press Ctrl+B, then D to detach from the session. The script will automatically tear down and exit.
Installing FoundationStereo
Estimated installation time: 5 minutes
FoundationStereo is used to generate depth maps from ZED stereo camera images. We run it as a microservice (HTTP server) and provide a fork of the original FoundationStereo repository.
Important
The pixi environment, code and checkpoints for FoundationStereo requires around 20GB of disk space.
The checkpoints we use for FoundationStereo correspond to the non-commercial version. For commercial licensing, refer to: [https://github.com/NVlabs/FoundationStereo]
If you’re using the DROID GPU laptop, we recommend installing FoundationStereo on a separate GPU workstation if available to improve inference time. Otherwise, install it on the same machine where you installed TiPToP. Follow the instructions below to install FoundationStereo:
# Clone the repository
cd $TIPTOP_DIR
git clone https://github.com/williamshen-nz/FoundationStereo.git
cd FoundationStereo

# Install dependencies (this should take 1-2 minutes)
pixi run setup

# Download pretrained checkpoints
pixi run download-checkpoints
Next, run the demo script to ensure everything is set up correctly.
# Run the full demo (runs server and client)
pixi run demo
Hint
To run on a specific GPU, prefix the command with CUDA_VISIBLE_DEVICES=<gpu-id>.
For example, CUDA_VISIBLE_DEVICES=0 pixi run demo restricts execution to GPU 0. Use nvidia-smi to list GPUs and their IDs.
This will run both the server and a client that sends test images and displays the results in a cv2 window. The output should look like the figure below.
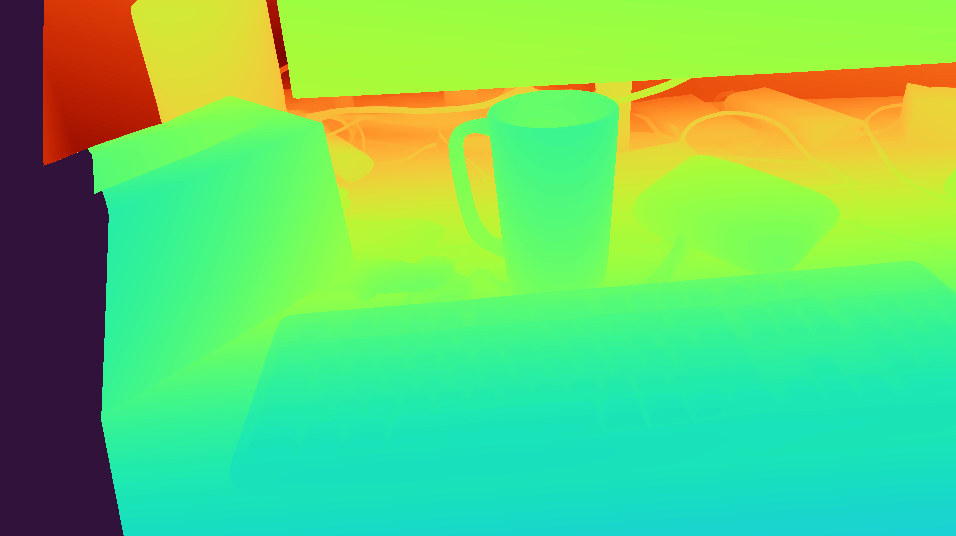
FoundationStereo depth visualization
The demo script runs in a tmux session and automatically attaches you to it. After you’ve verified it’s working, press q to close the cv2 window. Then press Ctrl+B, then D to detach from the session. The script will automatically tear down and exit.
🎉 Now your TiPToP installation is complete! Move on to the Getting Started page to configure your robot and run your first TiPToP demo.
Troubleshooting
Command not found: pixi
We use pixi to manage the Python environment and dependencies. If you don’t already have it installed, follow the instructions here to install: https://pixi.prefix.dev/latest/installation/
ValueError: numpy.dtype size changed, may indicate binary incompatibility.
This error occurs because pyzed 4.x is compiled against numpy 1.x and is incompatible with numpy 2.x at runtime. The recommended fix is to upgrade to ZED SDK 5.0+, which we officially support and is compatible with numpy 2.
If you must use ZED SDK 4.x, try downgrading numpy manually:
pixi run pip install "numpy<2.0"
This is safe to do. rerun-sdk is installed via conda and only requires numpy>=1.23, so it will continue to work correctly despite pip warning otherwise.
Note
If you installed ZED SDK 4.x via the .run installer, you may need to fix file permissions before pixi run install-zed can access the SDK:
sudo chmod -R o+rX /usr/local/zed
If you still encounter OpenCV compatibility issues after downgrading numpy, we have found that ZED SDK 4.0 specifically tends to avoid these issues. No other 4.x version seems to work as reliably.
M2T2: Checksum verification failed for weights/m2t2.pth
This issue may occur when running pixi run download-weights in the M2T2 directory.
It usually indicates that Git LFS is not installed. Although the pixi environment attempts to install Git LFS locally, you can resolve the problem by following the steps below from the top-level M2T2 directory:
# Install git lfs
sudo apt install git-lfs
git lfs install

# Remove the existing weights directory
rm -r weights

# Download the weights again
pixi run download-weights